RCSails Sailmaking
Sailing Monohulls
Sailing Multihulls
- 65M Class
- Mini40 / F48 Class
- Ninja
- FireDragon
- WRTM40 R2
- Nightmare X
- Triton II
- Inferno
- Nightmare MK VIII
- Venom
- Venom R
- Wavedancer
- Triton
- MultiOne Class
- 2m Class
Powerboats
Tips & Tricks
About us
Links
Follow @twitter
Courtesy of Andreas Schiebel (GER 202)
Sails are the only means to propel a RC yacht that's why a lot of attention is needed building the sails. Anyway it is not difficult to build well cut and working sails. The more experienced the sail maker gets the better the sails work. This guide is intended to help newbies to cut heir own sails and build their own rigs.
Sailmaking Tips:

A piece of thin melamine board about 50x200cm is very helpful to loft the outline of the sails. Use packing paper to sketch the outlines according the class rules or a finished sail. Described here is building a sail set for the IOM class.
The IOM class has exactly defined sail dimensions unlike other regatta classes.
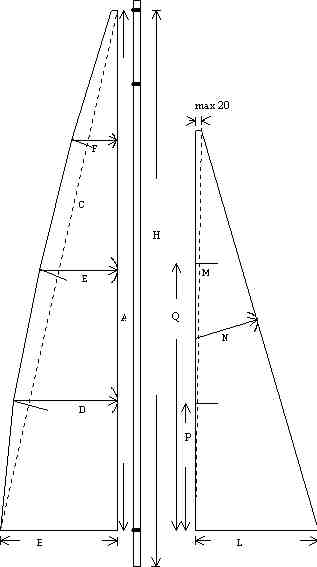
When the sail sketch is done we draw a line at about 30-40% distance from luff to mark maximum camber of the foil (there are different opinions about the exact position, the author prefers 33%). At right angle to this line we draw 3 lines in equal distance to produce the 4 width for the main sail(2 lines for the jib as it requires 3 width by the class rules).
Wide spread materials for sail making are Mylar or Polyester Drawing Film in thicknesses of 50 or 70 micron. If you have to use rolled polyester drawing film you should roll it against twist on a larger roll for several days to counter the initial twist. When gluing the prepared sheets don't forget remember to glue sheets with altering twist up and down and in longitudinal direction. We cover our drawn plan with the film and cut the sections with enough excess length. Don't forget to mark the line of maximum camber. Now we glue suitable two sided tissue tape without tension to the lower of two sheets to join. It is very important to exercise no tension to the tissue tape or the sail, otherwise you will have wrinkles afterwards.
When all sheets are prepared we can start joining them.

We use a two part jig made from ply wood. Its profile is similar to an airfoil with about 10% of camber. The highest point is at around 33% chord and is marked on the jig. At the joint of the two jig parts one piece bends down around 2-3° and can be adjusted to more or less bend (more bend-more camber of the sail can be used in the upper sections).


We attach the lowest section to the jig using masking tape with the camber mark on the section and the jig in line. Next we attach the upper section to the bend half of the jig the same way. The two sections should overlap by the width of the tissue tape. When everything is lined up careful remove the protective film of the tissue tape and glue the two sections together without tension and sufficient pressure. We proceed with the following sections the same way. Using the jig the seam is narrower at maximum cambers but this is only 1/10 of a millimeter and hardly to see.

Now we have the raw sail. We transfer the exact outlines from our drawing to the sail and can cut the sails now. The luff of the main sail should be convex to support the bend of the mast. To get this line cut easily we fix the luff at both ends with little tension and lay a 2m long cutting ruler along the luff. Now we lift the leech to get the sail off the surface. We can cut the luff along the ruler with a sharp cutter knife now. After cutting we will see a slight curve in the luff.

The solution with cans on the picture is not suitable - it was just made to take the picture. Best have a friend helping you or mark the luff with a pencil and cut it with a pair of scissors if no help is available.
If you wish more camber at the top of the sail simply lift the leech up slightly more - if you wish less then lower it slightly.
The author then cuts a wedge of 5mm to the first seam, it is a good idea to cut the leech last when the luff is perfect; it is important to test fit the sail to the mast first in case there are some changes to be made on the luff.
Spinnaker repair tape or other cloth tape works well for the reinforcements. The luff of the main sail can be reinforced with this stuff as well. To fit the sail to the mast prepare an eyelet every 10 to 15cm to tie the sail to the mast. If you do not have eyelets you can use a sharp soldering iron to glue small holes into the sail.


To connect the forestay with the luff of the jib sail we have different possibilities. Cut some plastic tubes to about 1 cm length and attach them with spinnaker repair tape or use plain spinnaker repair tape strips to do. Be careful to prevent the forestay to stick to the strips.
The most complicated solution is to build a pocket of spinnaker cloth attached with two sided tissue tape to the luff. Its the best looking solution and aerodynamic the best if you can get it attached wrinkle free - this will need a lot of trying.

For round masts the main sail is tied to the mast with some Dyneema line. To get the same slack it is best to use some 3mm round-bar as a distance when knotting the lines.

To build battens you can press carbon cloth saturated with epoxy between two glass plates and cut the cured sheet. The easiest way to make battens is cutting them from an old x-ray film.

Sailmaking
Sails are the only means to propel a RC yacht that's why a lot of attention is needed building the sails. Anyway it is not difficult to build well cut and working sails. The more experienced the sail maker gets the better the sails work. This guide is intended to help newbies to cut heir own sails and build their own rigs.
A piece of thin melamine board about 50x200cm is very helpful to loft the outline of the sails. Use packing paper to sketch the outlines according the class rules or a finished sail. Described here is building a sail set for the IOM class.
The IOM class has exactly defined sail dimensions unlike other regatta classes.
When the sail sketch is done we draw a line at about 30-40% distance from luff to mark maximum camber of the foil (there are different opinions about the exact position, the author prefers 33%). At right angle to this line we draw 3 lines in equal distance to produce the 4 width for the main sail(2 lines for the jib as it requires 3 width by the class rules).
Wide spread materials for sail making are Mylar or Polyester Drawing Film in thicknesses of 50 or 70 micron. If you have to use rolled polyester drawing film you should roll it against twist on a larger roll for several days to counter the initial twist. When gluing the prepared sheets don't forget remember to glue sheets with altering twist up and down and in longitudinal direction. We cover our drawn plan with the film and cut the sections with enough excess length. Don't forget to mark the line of maximum camber. Now we glue suitable two sided tissue tape without tension to the lower of two sheets to join. It is very important to exercise no tension to the tissue tape or the sail, otherwise you will have wrinkles afterwards.
When all sheets are prepared we can start joining them.
We use a two part jig made from ply wood. Its profile is similar to an airfoil with about 10% of camber. The highest point is at around 33% chord and is marked on the jig. At the joint of the two jig parts one piece bends down around 2-3° and can be adjusted to more or less bend (more bend-more camber of the sail can be used in the upper sections).
We attach the lowest section to the jig using masking tape with the camber mark on the section and the jig in line. Next we attach the upper section to the bend half of the jig the same way. The two sections should overlap by the width of the tissue tape. When everything is lined up careful remove the protective film of the tissue tape and glue the two sections together without tension and sufficient pressure. We proceed with the following sections the same way. Using the jig the seam is narrower at maximum cambers but this is only 1/10 of a millimeter and hardly to see.
Now we have the raw sail. We transfer the exact outlines from our drawing to the sail and can cut the sails now. The luff of the main sail should be convex to support the bend of the mast. To get this line cut easily we fix the luff at both ends with little tension and lay a 2m long cutting ruler along the luff. Now we lift the leech to get the sail off the surface. We can cut the luff along the ruler with a sharp cutter knife now. After cutting we will see a slight curve in the luff.
The solution with cans on the picture is not suitable - it was just made to take the picture. Best have a friend helping you or mark the luff with a pencil and cut it with a pair of scissors if no help is available.
If you wish more camber at the top of the sail simply lift the leech up slightly more - if you wish less then lower it slightly.
The author then cuts a wedge of 5mm to the first seam, it is a good idea to cut the leech last when the luff is perfect; it is important to test fit the sail to the mast first in case there are some changes to be made on the luff.
Spinnaker repair tape or other cloth tape works well for the reinforcements. The luff of the main sail can be reinforced with this stuff as well. To fit the sail to the mast prepare an eyelet every 10 to 15cm to tie the sail to the mast. If you do not have eyelets you can use a sharp soldering iron to glue small holes into the sail.
To connect the forestay with the luff of the jib sail we have different possibilities. Cut some plastic tubes to about 1 cm length and attach them with spinnaker repair tape or use plain spinnaker repair tape strips to do. Be careful to prevent the forestay to stick to the strips.
The most complicated solution is to build a pocket of spinnaker cloth attached with two sided tissue tape to the luff. Its the best looking solution and aerodynamic the best if you can get it attached wrinkle free - this will need a lot of trying.
For round masts the main sail is tied to the mast with some Dyneema line. To get the same slack it is best to use some 3mm round-bar as a distance when knotting the lines.
To build battens you can press carbon cloth saturated with epoxy between two glass plates and cut the cured sheet. The easiest way to make battens is cutting them from an old x-ray film.